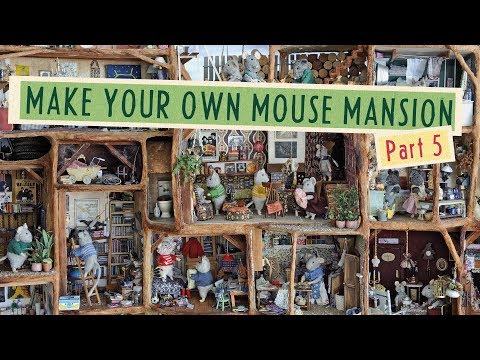
Welcome to the grand finale of Make Your Own Mouse Mansion — the complete video series! You started with an empty cardboard box in Part 1, and over the course of this series, you have built walls, laid floors, crafted furniture, added decorations, installed windows and doors, and poured your heart into every tiny detail. This is Part 6 of 6 — the moment where we step back, admire the finished mansion, and celebrate what you have created.
What This Episode Covers
This is the grand reveal. Karina walks you through the completed mansion room by room, pointing out details and sharing the stories behind each space. She also shares practical tips for photographing your finished mansion so it looks its best, and gives you plenty of ideas for what to do next — because a mouse mansion is never truly finished.
Step by Step
Step 1: The Room-by-Room Tour
Take a moment to appreciate what you have built. Go through each room of your mansion and look at the details: the wallpaper you chose, the furniture you constructed, the tiny food on the kitchen counter, the books on the shelves. Every single thing in your mansion was made by hand, and that is something to be proud of. Karina walks through her completed mansion in the video, sharing the thought behind each room.
Step 2: Final Adjustments
Before photographing, do a final check. Straighten any furniture that has shifted. Press down any wallpaper corners that have lifted. Make sure your miniature props are arranged the way you want them. Look at each room from the front — the viewing angle — and adjust anything that looks off. This is your chance to perfect each scene.
Step 3: Photograph Your Mansion — Lighting
Good lighting is the most important factor in photographing miniatures. Karina recommends natural daylight whenever possible — place your mansion near a window. Avoid direct sunlight, which creates harsh shadows. If you are photographing in the evening, use a desk lamp to light the front of the mansion. If you added LED lights inside the rooms (from Part 5), turn them on for a warm, atmospheric shot.
Step 4: Photograph Your Mansion — Angles
The best angle for photographing a mouse mansion is straight on at room level — as if you were a mouse looking in. Get your camera or phone down to the level of the rooms rather than shooting from above. Take wide shots of the entire mansion and close-up shots of individual rooms and details. Karina suggests taking many photos and choosing your favourites afterwards.
Step 5: Photograph Your Mansion — Composition
Place a mouse figure in the scene if you have one — it gives the viewer a sense of scale and makes the photograph come alive. You can also photograph the mansion with its creator (you!) standing proudly beside it. Try different backgrounds: a plain wall works well, or you can place the mansion outside in a garden for a more natural setting.
Step 6: Share Your Creation
You have built something wonderful — share it! Post your photos on social media, show your friends and family, bring it to school or to a craft group. The Mouse Mansion community loves to see what people create. Tag your photos so other builders can find them and be inspired by your work, just as you were inspired by Karina.
Where to Go from Here
A mouse mansion is never truly finished — that is part of the fun. Here are some ideas for continuing your creative journey:
- Add more rooms. Attach another box to your mansion and build new spaces — a shop, a school, an attic, or a garden.
- Try new clay projects. Expand your kitchen with more miniature food, or try making clay figures. Visit our clay tutorials for inspiration.
- Build new furniture. Try a miniature stove, chairs and a beach lounger, or a new bookcase.
- Create a living room. Follow our Build a Miniature Living Room tutorial for a whole new project.
- Make your own mice. If you are ready for a bigger challenge, learn how Karina makes her famous mouse figures: Part 1: The Body and Part 2: The Clothes.
- Revisit any part of this series. Go back to Part 1 and start a second mansion — you will be amazed at how much better and faster you are the second time around.


Comments
Be the first to comment!