Welcome back to Make Your Own Mouse Mansion — the complete video series! In Part 1, you built the basic structure of your mansion from a cardboard box. Now it is time to turn those bare cardboard walls into cozy, beautiful rooms. This is Part 2 of 6, and it is all about surfaces: wallpaper, wainscoting, and floors.
What This Episode Covers
Bare cardboard walls are perfectly functional, but they don't exactly scream "home sweet home." In this episode, Karina transforms the inside of each room with wallpaper, adds elegant wainscoting along the lower walls, and lays gorgeous popsicle stick floors. These three techniques are the foundation of every beautiful miniature room, and once you master them, your mansion will instantly look a hundred times more charming.
Step by Step
Step 1: Choose Your Wallpaper
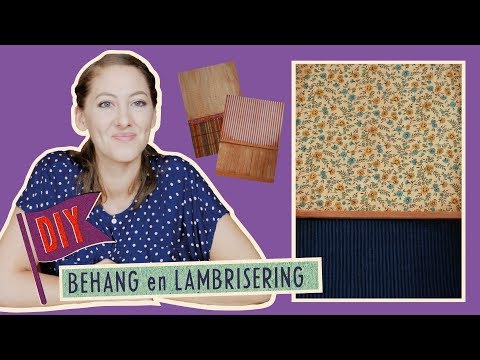
You can use scrapbook paper, wrapping paper, printed patterns from the internet, or even paint to create your walls. Karina likes to use different patterns for different rooms — a floral print for the bedroom, stripes for the hallway, a warm colour for the kitchen. Cut your paper to size before gluing so you get a clean fit. For the full technique, see: Wallpaper and Wainscoting for Your Miniature House.
Step 2: Apply the Wallpaper
Use a glue stick or white craft glue to attach the wallpaper to each wall. Start at the top and smooth downward to avoid air bubbles. Work one wall at a time and press firmly along the edges. If your paper is slightly too big, trim it with a craft knife after it is glued in place for a perfect edge.
Step 3: Add Wainscoting
Wainscoting is the lower panel section of a wall, and it adds a wonderful sense of detail and realism. Cut a strip of contrasting paper or thin cardboard to about one-third the height of your wall. Glue it along the bottom of each wall, on top of the wallpaper. You can add a thin strip of paper along the top edge to create a chair rail. This small detail makes a huge difference!
Step 4: Prepare Your Popsicle Stick Floors
Popsicle sticks make the most wonderful miniature wooden floors. Karina shows you how to stain them with tea or watercolour paint to get a natural wood tone. You can also leave them plain for a lighter, Scandinavian look. For a complete guide to this technique, visit: Making Miniature Floors from Popsicle Sticks.
Step 5: Lay the Floors
Once your sticks are dry, glue them side by side onto the floor of each room. Stagger them slightly like real floorboards for a more realistic effect. Trim any sticks that overhang the edges. If you prefer a tile effect for a kitchen or bathroom, cut small squares of paper or cardboard instead.
Step 6: Finishing the Edges
Add thin strips of paper or cardboard along the edges where the walls meet the floor to create skirting boards. This hides any gaps and gives a polished, finished look. You can also add a strip along the top of the walls as a cornice.
What's Next?
Your rooms are looking beautiful — but they are still empty! In Part 3, Karina shows you how to build your first furniture pieces and arrange them into cozy, liveable rooms. Time to fill those gorgeous spaces!


Comments
Be the first to comment!